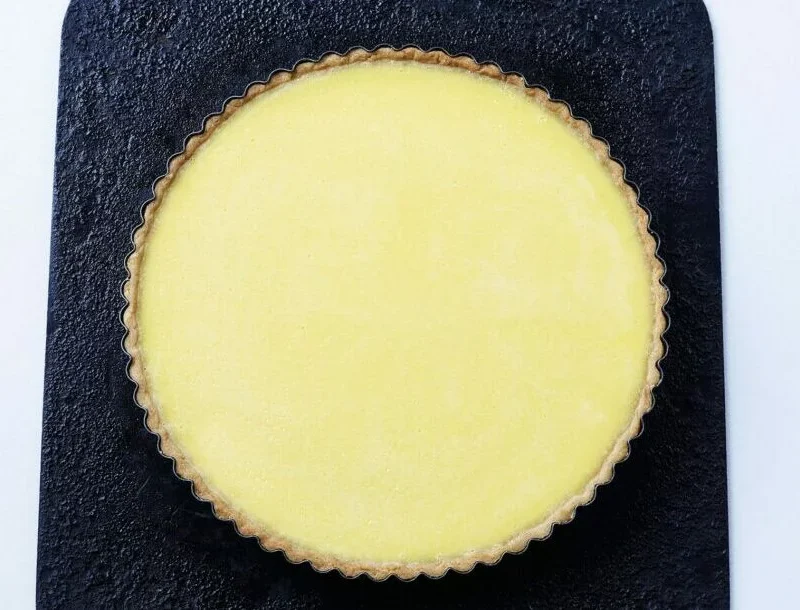
As promised here is the Lemon tart recipe from Leiths latest book Leiths How to Cook (Quadrille, £30). Photograph: Peter Cassidy. (see the whole book review here) oks sooooo good!
Lemon tart
Serves 6
- 1 quantity pâte sucrée (below)
- Extra flour, to dust
For the filling
- 3 lemons
- 6 eggs, plus 1 extra yolk
- 150–170g caster sugar
- 225ml double cream
- Icing sugar, to dust
1. To make the filling, finely grate the zest of the lemons and squeeze the juice; you will need about 100–125ml juice. Put the eggs and extra yolk into a large bowl, add 150g of the sugar and, using a balloon whisk, mix well. Add the cream, zest and juice, and stir until combined. Cover and chill in the fridge for 2–3 hours, preferably overnight, to allow the flavours to develop.
2. Roll out the pâte sucrée on a lightly floured surface into a disc about 30cm in diameter and about 3mm thick. Use to line a 24cm loose-based flan tin or flan ring set on a baking sheet. Cover with cling film and chill until very firm to the touch. Meanwhile, heat the oven to 190°C/gas mark 5.
3 Once the pastry is firm, make a cartouche of greaseproof paper 8-10cm bigger than the tart tin. Scrunch it up then unfold it and use to line the pastry case. Add a layer of dried beans or ceramic baking beans. Blind bake the pastry for 15–20 minutes, ensuring the paper cartouche is pushed well into the corners of the pastry and the excess paper is folded over the edge of the pastry case, to help prevent the pastry from browning. Remove the beans and cartouche, taking care as the pastry is still very soft, and bake for a further 5 minutes. Remove from the oven and reduce the oven temperature to 150°C/gas mark 2.
4 Taste the filling. If it seems too sharp, add some or all of the remaining sugar, to taste. Strain into a jug and pour the filling into the pastry case, filling it about half full. Transfer the tart to the oven and pour in more filling until the tart is as full as possible. Bake for40–50 minutes until almost set, with a very soft wobble across the surface. A violent ripple across the middle of the filling indicates it is not set.
5 Take the tart out of the oven as soon as the filling is set, allow it to cool a little, then carefully remove the sides of the tin or flan ring. Leave to cool completely, then dust with icing sugar. You can glaze the icing sugar dusting using a kitchen blowtorch if you wish, but take care not to burn the pastry.
Pâte sucrée
This is an enriched version of shortcrust pastry, with extra butter and egg yolks replacing the water. We use a traditional method of making pâte sucrée by hand, although it can be made in a food processor. It tends to be cooked at a slightly lower temperature than shortcrust because of its high fat and sugar content, as fats and sugars both encourage browning. It should be thoroughly cooked but only to a very pale biscuit colour. Once cooked, it needs to be released from tins or baking trays while still warm, or the pastry will stick.Makes enough to line a 24cm flan ring
- 250g plain flour
- Pinch of salt
- 125g unsalted butter, softened
- 125g caster sugar
- 4 small egg yolks
- 2–3 drops of vanilla extract
1 Sift the flour and salt onto a clean work surface and, using the side of your hand, spread the flour out into a large ring.
2 Place the softened butter, in one piece, in the middle and, using the fingertips of one hand, push down (‘peck’) on the butter to soften it a little more, but without it becoming greasy; it should be soft, but still cold. It is important that the butter is uniformly soft, as if there are still small lumps of cold, hard butter in the mixture they
an cause greasiness and holes in the finished pastry.
3 Sprinkle over the sugar and ‘peck’ until the sugar is just fully incorporated.
4 Add the egg yolks and vanilla extract and continue to ‘peck’ until the egg yolk is fully incorporated and there is no colour streakiness.
5 Using a palette knife, flick all the flour onto the butter, sugar and egg yolks and, using the edge of the palette knife, ‘chop’ the flour into the butter and sugar mixture. This technique helps to keep the flour from being overworked. Use the palette knife to lift any flour left on the work surface to the top occasionally.
6 As you continue to do this, you will create large flakes of pastry. Continue until there are no obvious dry floury bits among the pastry; it should be a fairly uniform colour. Floury patches at this stage will mean having to overwork the pastry at the next stage to incorporate them.
7 Now shape the pastry into a long sausage and, using the palette knife on its side, scrape a little of the large flakes together at a time. This will finally bring the pastry together and is called ‘fraisering’. As more pastry sticks to the palette knife, scrape it off using a cutlery knife to avoid overworking it. Continue in this manner until all the pastry is fraisered: one or two more fraiserings are possible, but the more you fraiser the more the pastry will be overworked.
8 Bring the pastry together with your hands to form a ball.
9 Now shape the pastry into a flat disc. Wrap well in cling film and chill to allow the butter to firm up before rolling out.
EmmaMT
x
Leiths How to Cook (Quadrille, £30).Amazon, Photograph: Peter Cassidy. How to Cook
Some More Lemon Recipes you may enjoy
Lemon Biscuit Recipe
https://cakesbakesandcookies.com/leiths-how-to-cook-lemon-tart-recipe/
Vegan Zesty Lemon Biscuits
Peggy Porschen’s Lemon Limoncello Cake recipe
Lemon Victoria Sponge
Mary Berry’s Lemon Drizzle traybake recipe
Melt in your mouth Lemon butter biscuits recipe
Leiths ‘How to Cook’ Lemon Tart recipe
Easy Peasy Lemon Curd. Great On Toast, Cakes And Spoons
Easy Lemon Curd Recipe
Try This Lemon And Lime Madeira Cake Recipe. You’ll love the ZING!
Peggy Porschen’s Lemon Limoncello Cake recipe
Lemon Victoria Sponge Recipe