
FAQ: Do you have a 10″ Madeira cake recipe?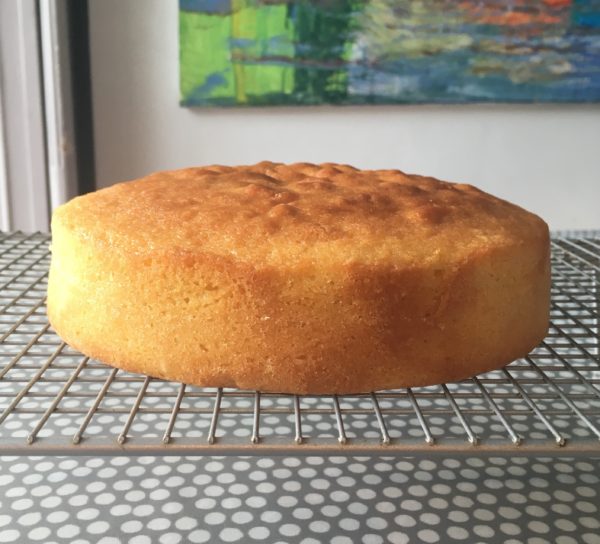
Yes I do, but boy do people seem to be having problems with it! It got to the point where I was starting to think there was something wrong with it. Readers were having cakes with soggy middles and deep dark crusts on the outside. There were massive domes and sunken middles. I was perplexed! So, I decided to double check the recipe. It came out perfectly. So here’s a post dedicated to exactly what I do to make my 10″ Madeira cake a success – literally step by step.
Double check the size of your tin.
The first thing I did was measure the volume of water my 10″ cake could take. Previously I found it could hold 4000ml but I decided to try it with a little less – 3700ml. The reason for this is that when I make a larger cake the more mix in the tin the heavier the cake is. When I use a little less mix the cake seems to rise more. This was the case with this cake. Just removing 300ml of cake ingredients to this cake made all the difference.
Line and wrap your cake tin and chill it out!
I have always lined my cake tins using silicon paper and vegetable oil – to make it stick to the sides. Oil gives the cake a much softer finish. I know some people like a crust and if that’s the case keep using butter to grease your tins.
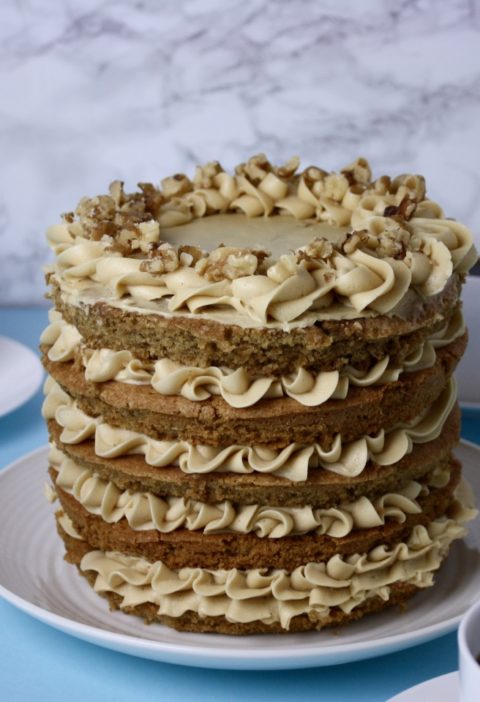
Once lined I wrap the cake tin with a strip of silicon paper tied with natural string. You can read more about this here. As you can see from the top photo, I use the same paper over and over and it still works well.
A new trick I recently read about was to chill the cake tin once it is lined. This further stops the outside of the cake from baking too quickly. I left mine in the fridge for 30 minutes before I filled it with cake mix and baked it.
The 10″ Madeira cake recipe
- 235g butter at room temperature
- 235g margarine at room temperature
- 620g caster sugar
- 3 tsp vanilla essence
- 9 eggs large eggs at room temperature
- 700g plain flour sieved
- 5 tsp baking powder
- 150ml hot water
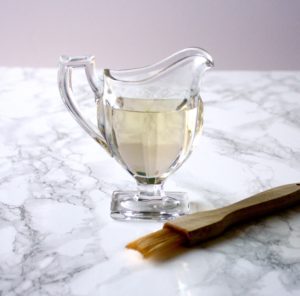
Sugar syrup
- 100ml water
- 100g caster sugar
- 1 tsp vanilla essence
How to make the 10″ Madeira cake.
- Pre-heat your oven to 180ºC (Fan oven160ºC) It’s really important to get the oven to the right temperature. The rising domes are usually caused by the oven being too hot. Sunken cakes are from when the oven temperature is too low – or the oven door is opened too early. My oven fluctuates (especially with cakes that are in the oven for a long time like this one!) so I tend to let it drop a little to 175ºC to allow for the differences during the bake. I still get a dome but I don’t mind. It means I can see how well the cake is baked and get to eat a bit too. Who doesn’t love off cuts? The biggest problems with baking this cake seem to come from using a fan oven. It just doesn’t bake as well. I tested the recipe out using my fan and the cake tasted completely different and was really heavy. My mum who has a gas oven always has the lightest, fluffiest Madeira cake known to man – I am very jealous! So if oyu can use a non fan oven do. If you can use gas – even better. One last word on temperatures is to invest in an Oven Thermometer
. I trust mine way more than I trust the dial on my oven – which has lied to me from day one!
- Start the cake mix by creaming the butter and margarine together. Make sure they are seamlessly blended before adding the sugar. Beat till it’s pale and fluffy. This will take at least 3-4 minutes. The whiter it looks the fluffier it is which makes a lighter cake.
- Very slowly add the eggs – a spoonful at a time. The slower you add the eggs the less chance there is of the mixture curdling. I have found that I have a much better mix if I use my very fast hand held whisk rather than my beloved Kitchenaid stand mixer. The hand held is much faster and whips it all up into a frenzy catching every last bit of cake mix whereas the stand mixer gets most of it most of the time. There’s no comparison. If the mixture does start curdling (separating and looking a bit yuck) add a spoonful of flour during mixing to stop it.
- Add the vanilla essence and mix again till it’s well incorporated.
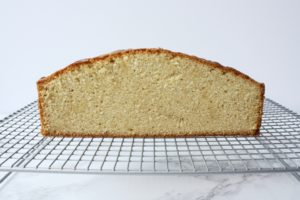
- When it comes to adding the dry ingredients I tend to sieve the flour and baking powder into a separate bowl and have the hot water ready. Add the flour and water in three goes. This produces the fluffiest and most moist cake rather than adding all the flour then all the water. Fold them in gently and slowly. Fold until the flour is just incorporated. The less mixing and folding the more air bubbles you’ll have to make a light and fluffy cake.
- Pour the mixture into the cake tin. Using the back of a spoon spread the mix throughout the tin pushing it up the sides of the tin slightly leaving a well in the middle. I leave quite a deep well and still get a dome so be brave.
- I have been loosely covering my cakes as soon as they go into the oven with a piece of silicon paper with a hole in the middle. If I think the paper is going to touch the cake as it rises I grease it first. The hole is to allow the steam to escape. The paper keeps the cake more flat on top. I tend to remove the paper for the last 30 minutes so it can brown up.
- Bake for two hours in the centre of your oven. If you have the choice place your cake on a wire rack in the oven rather than a tray. A tray will stop the heat from circulating. I remove all the unused racks from the oven when I bake. Don’t be tempted to open the oven door for the first 30 minutes. It will make the cake sink.
- To test if your cake is fully baked insert a skewer into the centre of the cake – always the centre as this is the last area to bake. If it comes out clean without any cake mix residue it’s ready. If there is some moist mix on the end you need to pop it back in for a few minutes more. You can also press lightly on the top of the cake with a finger. If the cake bounces back instantly you know it’s done. If it takes more than 2-3 seconds then you know it needs more.
When a cake bakes the outer edge bakes first (as it’s against the hot metal cake tin.) For this reason when the middle of your cake is baked the sides will shrink away from the cake tin. This is another good indicator that the cake is baked.
 The sugar syrup
- To make the sugar syrup heat the water and sugar until the sugar is completely dissolved. Let it simmer for 2-3 minutes then add the flavour and leave to cool. I make my sugar syrup as soon as the cake goes into the oven then I leave it .
- Once your cake is removed from the oven let it sit for 5-10 minutes then use a pastry brush to brush the sugar syrup over the entire cake. You only need to cover each area of the cake once and avoid soaking the cake or you will end up with a big soggy mess not a nice moist cake. Make sure you get the edges of the cake covered as they tend to dry out the most. Some people worry that the cake will be overly sweet by adding the sugar syrup but it actually seals the cake and stops it from baking once it’s out of the oven. Don’t feel you need to use the whole amount. You will have some left over.
- Leave the cake to cool for a further 10-20 minutes before turning your cake out onto a rack to cool completely.
I made this cake and decided not to cover it or cut it in half and fill with butter cream. One of my favorite ways to enjoy Madeira cake is by the slice with a lovely dollop of raspberry jam. I cut this one in half and froze one side while we ate the rest. This is a pretty big cake so it was a good test of how long it tasted good for. I always advise to have eaten a cake that has been decorated (and therefore sealed) within a week of baking. This cake sat on a plate in my kitchen loosely covered with a piece of silver foil for 10 days – slowly getting smaller and smaller. On the 10th day it was getting a bit stale but right up till then a spread of jam and it was great with a cup of tea!
Why Sugar syrup works
Another benefit to adding sugar syrup to a cake – which I hadn’t realised before is that it gives the cake crust a lovely sweet flavoured crunch. Not a hard crunch – just a gentle one. I actually looked forward to eating that part as much as I did the soft sponge. Nice surprise!
I think a lovely thin slice is perfect. Beau does not! After asking if she could have a slice this is what she cut and filled for herself! I could have made four servings from that giant slice. And before you ask- yes she ate the lot! Growing girl!
I hope this helps with some of your Madeira cake queries.
Happy baking
EmmaMT
x
More Madiera you may like.
My Mum’s Madeira Cake Recipe Is The Best In The World
6-12″ Madiera Cake ingredients
Try This Lemon And Lime Madeira Cake Recipe. You’ll love the ZING
The Ultimate Chocolate Madeira Cake Recipe To Make Different Size Round Tins from 6 to 14″
How to adapt a cake recipe for different size tins and a 10″ Madeira cake recipe.
How To Bake A Large 14″ Square Madeira Cake
FAQ: How do I work out the ingredients for an odd shaped cake tin


This cake looks amazing and delicious! I seldom bake such a big cake as the family is small and I have to be considerate to my my waist line, hehe.
I’ve used your 10 inch recipe to practice for a wedding cake and have had mixed results…..looking forward to trying this one out this weekend