

How to make a simple sleepover cake
Beau was eight years old on Monday. Her birthday cakes have got more and more detailed and adventurous as I have got more experienced and she has got older. When asked what cake she wanted this year she said
“ I want a two tier cake like a wedding cake with me sleeping on the top and my friends sleeping on the bottom of the cake” !!!!!!!
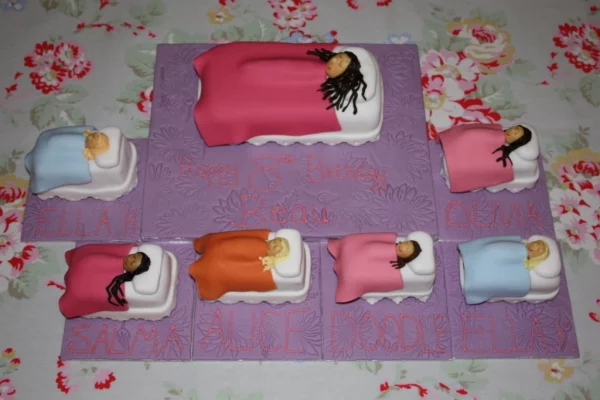
She was obviously having her first sleepover party.So we compromised. Beau’s main cake which we cut at her party, had her sleeping on a big bed and each of her friends had a separate mini ‘bed’ cake of their own, in which they were sleeping and could take home with them the next day.
The idea was to make all the cakes sit alongside each other so that it felt like one big cake.I used my favourite chocolate cake recipe (below) which is really chocolatey, super quick to make and super light and fluffy.
Two bowl chocolate cake recipe
Ingredients
3 tbsp hot water
3 tbsp cocoa powder
100g soft butter
100g caster sugar
100g Self Raising Flour
2 eggs
1 tsp baking powder
½ tsp vanilla essence
To make the chocolate cake
Grease two 18cm sandwich tins (I used 3 x the ingredients and 3 loaf tins for this cake). Line the bottoms with baking paper. Heat your oven to 180C, gas mark 4.
Sieve the cocoa powder into a bowl, then add the hot water and blend really well until there is no dry powder left. Set to one side to cool.
In another bowl mix all rest of the ingredients together until well blended and then add the cocoa mixture and blend again.
Spoon the mixture into the tins and bake for 25 minutes or until a skewer comes out dry. This cake rises a little so you can also test that it’s baked by pressing down on the top of the cake. If it springs back it’s ready. If it leaves a finger print or takes a while to rise up again it will need a little longer in the oven.
Chocolate buttercream
Ingredients to fill and cover a two bowl chocolate cake
75g soft butter
100g icing sugar
½ tsp vanilla essence
2 tbsp cocoa powder
How to make the buttercream
Put all of the ingredients into a bowl then blend until really light and fluffy. This makes enough to fill an 18cm cake and cover the top (and sides if you don’t use it too thick)
To make the sleepover cake

Cover your cake boards with sugarpaste. Use a patchwork cutter to create a pattern in the ‘carpet’. Leave to dry for at least a week. If you use it straight away it may dent when you touch it!

I used three times the recipe to make three loaf sized chocolate cakes. One cake was used for the main bed and the other two were cut into rectangles for the smaller beds. Each cake was cut in half and had buttercream added to the centre.

It’s a good idea to bake the cakes in advance to decorating them. If it’s really, really fresh this cake will just crumble when you apply the buttercream. 24 hours after baking is a good time to decorate. Once the cake is iced it’s sealed so it will stay moist and fresh.
Add buttercream to the top and sides.
Cover each cake with white sugarpaste then secure the cake in place on it’s cake board with a little royal icing. This creates the ‘sheet’ over the bed.

Use edgers to make strips of decorative sugarpaste and secure them along the bottom of the bed. Use Royal icing as glue.

Use a sugar craft tool, or the end of a paintbrush to give the valance more detail.

Mould a piece of white sugarpaste into a rectangular shape for the pillow. The heads are made from marzipan which has been coloured with a tiny bit of food colour (paprika is perfect for a skin tone). Use a very thin paintbrush to add the colouring of the eyes, eye brows mouth and cheeks. A tiny ball of marzipan is used to create a nose.

Roll a sausage shaped piece of marzipan for the body. Taper it in at the end where the feet would be. Secure it to the bed.

Roll out a piece of coloured sugarpaste for the blanket. Leave it long enough that it will drape over the edges of the bed. Make sure each little lady is well tucked in up to her neck.
Colour royal icing to add the hair. Then all that’s left to do is add the names on each cake board and the ‘Happy Birthday’ on the largest cake board.

While I was finishing this cake Beau and Darcey made some accessories that you would find in their bedroom. They made books, hats and a dolls house that opens up. Beau even made a train complete with track which they positioned all over the cakes.

In all the cake was a big success. I think all the guests liked it that they could take home their own Mini Me! Beau obviously had a great time as you can see below.


Enjoy!
More Kids Birthday Cakes you may enjoy
How to make a merry go rounds birthday cake
How To Make A Swimming Pool Cake
How to make a Mario and Yoshie Birthday Cake


Oh so beautiful Emma! That is the kind if cake Beau and get friends will remember for the rest if their lives. And the poor parents could never live up to that! Lol!!!
[…] friends coming along to her cinema trip birthday celebration I would do what I did with her cake last year and make individual cakes for all the guests. One large purple Lego brick was for Beau and each […]