
As I write this post (now last Saturday night) I have absolutely no internet connection. Nothing! Nada! Zip! Not a squat! And it’s not just my router that’s not working at home, my mobile is kerput too! So I have been web free for 5days. It’s at times like this that you realise how much you use the web, sit on facebook and miss your cake blog. Luckily, I have had plenty to keep me busy and away from my Mac.
Firstly I have made two life size snowmen for a Christmas press launch. They took hours and hours of paper mache, painting, covering in wadding and then covering in fake snow! Needless to say that when I got to the part of the week where I got to do baking I was happy!
The Rainbow cake
This cake was my birthday present for a very special little girl. She’s the daughter of my good friend Theoda and she’s too scrumptious for words! Theoda and I worked together on Woman and Home magazine and we shared one too many cupcakes, so I know how much she likes cake! She is also one of my biggest supporters of everything I do. ( Love you Fou!)

Anyway, when Theoda asked if I would make Dahlia’s 1st birthday cake I was honored. I mean I really wanted to make it but sometimes you have to wait to be asked – so that you don’t step on anyone’s toes. Theoda knew exactly what she wanted…

Theoda, Peter and the birthday girl. X
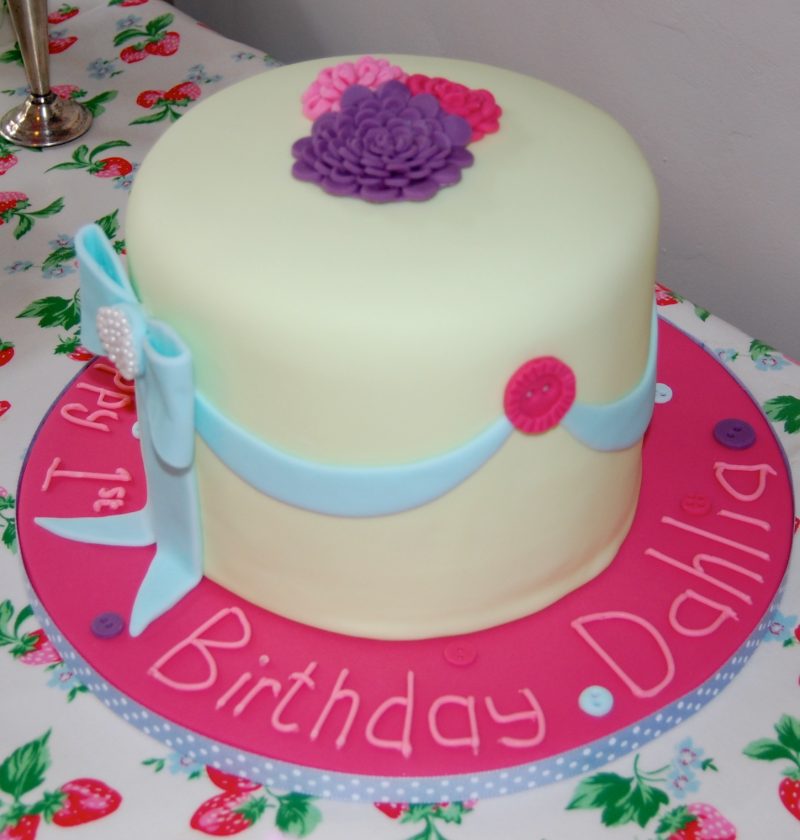
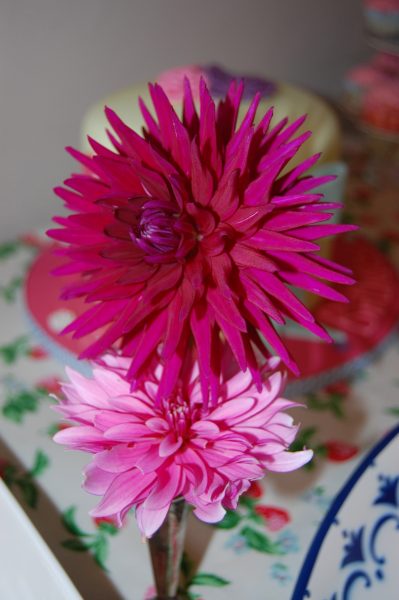
It had to have Dahlia’s on the top- obviously as that’s her daughters name. I made these with small circle cutters and then squidged each piece into place with my finger, adding more and more petals in a circle, layering up as I went. I wished that I had seen the flowers from Theoda’s garden (below) as I would have created this style flower instead. How beautiful are these? You can see why Dahlia was given such a beautiful name.
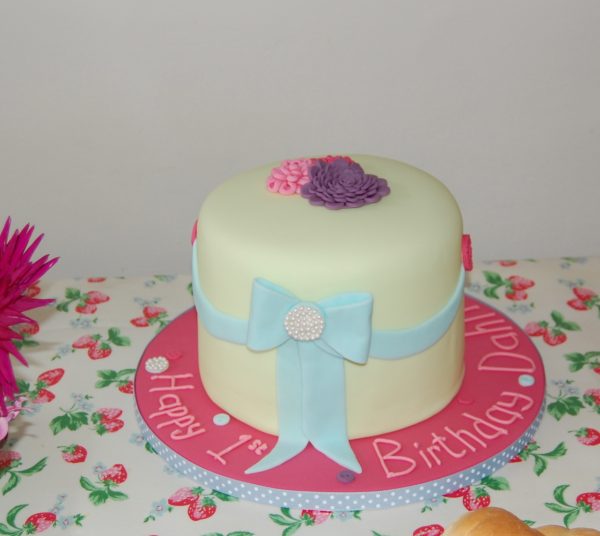
A few years ago I made a mini wedding cake inspired by a Mich Turner cake with a bow on the front, which Theoda really liked, I recreated that on the front of the cake with ‘modern’ swags. At each swag was a button, holding it in place.

As you can see the cake board was a strong pink colour and was dotted with more buttons made from sugarpaste and it was finished off with a cute spot ribbon. Jane Means ribbons are my favorite. They’re the best around and she has such a great selection.
The pièce de résistance came when Theoda cut the first slice. Inside the tall cake were six layers of Madeira cake, each layer in a darker pink colour than the one below it. There was tons of buttercream inside, to keep it straight and in between each layer. It looked great when cut and whats more each slice could feed a small army. The cake was huge!
Things I learnt making this cake…
- Don’t add the food colouring to the cake mix and keep stirring it as you colour each layer. By the time you get to the strongest colour you’ll have bashed all the air out of the mix (which is what makes it rise) and it will end up being a heavy biscuit of a cake. Instead mix up all the ingredients apart from the flour and separate it into bowls for each layer. Then colour each bowl. Fold in the flour and bake straight away. That way you can see the exact colour difference in each cake and they will all rise and be light and fluffy and delicious.
- I did a crumb coating on this cake and used a cake ruler to ensure the sides were as straight and level as I could get them. I then did a top coat of buttercream and again leveled the sides and top with the straight edge. Pop the cake in the fridge in between each buttercream covering so it sets and is easier to handle.
- When covering a cake this tall keep your rolled out icing thicker than usual so it has enough give. I left mine at around 1cm thick. Take your time when covering the cake. Smooth the top first, then gently manipulate the sides, working your way down with your hands and then with a smoother. If you start to get a crease at the bottom gently lift the sugarpaste away from the bottom of the cake and smooth it down from the top again. If you do end up with creases use ribbon, flowers or button decorations to hide them. No one will ever know!
- I didn’t put a thin cake board in between the cake layers because I made this cake out of Madeira Sponge which is a pretty ‘strong’ cake. If I had done more layers, or had used a softer more crumbly sponge I would have popped one under the middle layer with cake supports in the cakes underneath. This will stop the cake from sinking into itself or toppling over.
- Make the decorations a week in advance so that they set hard and can be handled. The bow was quite heavy once dry and was attached to the cake with royal icing. It had to be held in place for a minute or so till it was stuck.
More biscuits and cookies you may enjoy
Dairy Free chocolate chip cookie recipe
Fast from the freezer Double Chocolate Chip Cookie Recipe
Some seriously chocolatey cookies
The easy way to make Viennese biscuits
Vanilla Biscuits – chocolate style


This cake is perfect for little miss D 😀
It is beautiful beyond belief and I love your tips!
Cheers
Choc Chip Uru
Thanks Choc Chip Uru
Emma, I have not stopped talking about this beautiful cake you made for us. Everyone loved it as you could tell, and the ooh’s and aah’s that escaped tell the story of everyones amazement when it was sliced to reveal the 6 layers of pink. The best thing was, we could tell it was made with love. I thank you for that Em. We admire and love you so much. xxx
Mmmmmmmmwwwaaaahhhhh! XX
A totally gorgeous cake for a totally gorgeous baby! You’ve outdone yourself Em, I might have to have a baby, just so you can make one for me! xx
Just so I can make you a cake!!!!
Love this cake and your blog is very helpful. I am just setting up a little cake business part time and am learning as I go so people like you give invaluable tips and guidance.. thank you!! Your’s is the only blog I have signed up to so far… I am trying your Madeira cake receipe out next week – can’t wait.
I am doing a deep cake – not as deep as this – next week and it has ribbon round it. Not swags but straight ribbon. Any tips for this. I was going to lightly score the cake at the correct level but in the past the ribbon has torn or stretched when I transfer it over. Should I leave it to harden up a bit??
Thanks again for all your advice.
Emma
Thanks so much for your comment. That means so much to me.
When I make sugarpaste ribbon I use marzipan spacers like these…
(http://www.amazon.co.uk/PME-MS-99-Marzipan-spacers/dp/B0036KJGNI/ref=sr_1_6?ie=UTF8&qid=1342600433&sr=8-6)
…either side of the sugarpaste as I roll it out. That way it is perfectly flat and even.
Once rolled out use a pizza wheel to cut one side of the long length of the ribbon. It doesn’t matter if it’s not perfectly straight. You can push the cut edge against the side of a spacer to make it straight.
Then place the spacer ontop of the sugarpaste to use as a guide to cut the other side of the ribbon.
Once you have cut the length of sugarpaste ribbon smooth over the edges with your fingers.
Avoid lifting the ribbon from one end as it will stretch and go thin at that end. Instead use a palet knife or something very thin and flat to loosen the ribbon from the surface and lift it from underneath, near the middle, supporting where you can.
To attach it to the cake dampen the back of the sugarpaste ribbon with water and place it on your hand so you can tilt it onto the cake. You can smooth out any dents or marks on the ribbon once it’s on the cake.
I wouldn’t leave the sugarpaste to harden as it may crack when you put it on a rounded cake. If it’s soft you can gently rub out any dents. You can always hide bits that don’t work out as well as planned with flower/button/ word decorations.
Good luck. I’d love to see your creation. If you get a second to post a picture on the Cakes, Bakes and Cookies Facebook page that would be great.
http://www.facebook.com/pages/Cakes-Bakes-and-Cookies/260731630659816
EmmaMT
That’s great.. thank you so much. I will definitely post the finished cake when its done in 10 days fingers crossed it turns out ok x
This is a beautiful cake what size was it in diameter and how high as it looks to be around 8 inch. Thank you for your blog it always gives me tips and ideas i had never even considered.
Thanks so much for your kind words. It is an 8 inch cake. I scoured around to find 6 tins and miraculously I had them. Well one was technically the lidded tin from my large circle cutters but that doesn’t matter!
Hope you have fun baking it.
EmmaMT
Cake is fantastic, you are getting better and better. 6 layers, all in different colours…. wow!
(I wonder how long did it take you putting the whole master piece together… You must by the way have a HUGE fridge!)
Birthday girl is so pretty……So does her mum!
Ah thanks.
It took a while to make, then again they always do take longer than you expect don’t they! I think in total the cake took about 6-7 hours to make. Not bad I thought!
My fridge isn’t that big unfortunately. Luckily I nearly always make cakes at the weekend just before Tim does the weekly food shop so there’s a bit of space. I also have to remove shelves and bottles and jars to get the cake in, but it’s only for a short while!
Thanks so much for stopping by.
EmmaMT
Hi Emma
I had a couple of questions about your cake hope you can help!
You say you make your decorations before in order to handle them, when I do mine with regular ready to roll icing they always break when I come to use them! Am I using the wrong stuff?
Secondly what’s a crumb coating? And finally how you you get such a smooth finish? Mine ALWAYS look like they have cellulite no matter how patient I am!
Help!
Rachel 🙂 x
Hi Rachel,
Thanks for your comment. I try to make my decorations a week before the cake needs to be finished. If I run out of time I put them in a warm oven (about 50-100°C) for 10 minutes, take them out and leave them to cool down. This hardens them up much quicker and makes them easier to handle. Be sure not to touch them when they come out of the oven as they will mark really easily at this stage.
I do use ready roll icing (sugarpaste) but have recently discovered Squires modelling clay. It’s a cross between sugarpaste and floral paste. It dries really quickly but is much easier to use. I have to admit that I have broken many decorations in my time. My biggest nightmare was driving for an hour to deliver my friend Emma’s wedding cake only to discover on arrival that the grooms legs had fallen off! That was the last time I delivered a cake without an emergency decorating kit! I had to go back the next day with new legs and royal icing!
A crumb coating is when you give your cake a first coating of buttercream. It’s a thin coat that creates a base. You then pop the cake in the fridge so that the coating goes hard. After about 20 minutes you do a second coating. The crumb coating stops loads of crumbs from combing off the cake and makes it much easier to get a smooth finish ready for icing.
When it comes to getting your icing smooth it’s all about the base. A crumb coating and second coat of buttercream will help but really it’s about having the icing rolled out to no less that 5mm thick. I use my hands to do the first smoothing and edges then use a cake smoother to get it really flat. I think I will have to do a post on this as I have been asked how to do it a few times now.
I really hope that helps.
Good luck.
EmmaMT
This cake is beautiful, so how do you make it brown, marble, what do u add?
[…] make a really tall Madeira cake with different coloured rainbow layers inside. It was inspired by Dahlias 1st birthday cake. When each cake came out of the oven it looked just like the one before! The outside had browned […]
[…] I can’t quite believe that she is two already! It seems like just yesterday that I made a rainbow cake for her first birthday. It was the first time that I had a cake disaster! I’ve heard many […]