
So following on from my My top 5 cake disaster tips! Here’s how I made the sprinkle cake before disaster struck!
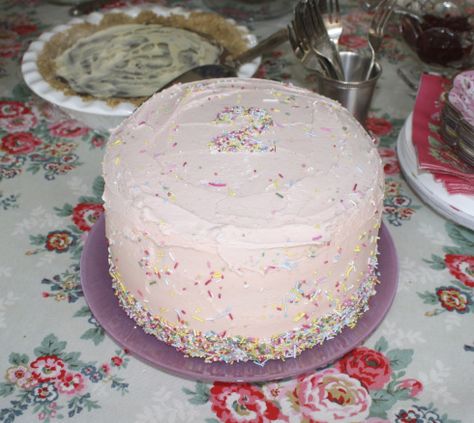
I wanted the cake to be nice and tall. As it was for Dahlia’s 2nd birthday and she is a pretty, girly little thing, it had to be pink. I made four 8″ Madeira cakes to stack with raspberry jam and coloured buttercream. I also wanted it to be a sprinkle cake on the inside too, so I added some sprinkles to the cake mix just before they went into the oven. It didn’t really work out as I had planned. I put in 55g (which is one entire pot) but they didn’t really show up very well when the cake was cut. I think next time I will put in 110g so it’s super colourful inside. The good thing about adding sprinkles to the cake mix is that they are sugar so they just melt into the sponge.
The Madeira cake recipe
(Makes four 8″ round cakes)
For the cakes
- 150g butter – at room temperature
- 150g margarine ( I use Flora)
- 400g caster sugar
- 2 tsp vanilla essence
- 6 eggs (large and at room temperature. Lightly whisked)
- 450g Plain flour – sieved
- 3 tsp baking powder
- 5 tbsp hot water
- 50-100g sprinkles
- Grease and line your baking tins. If you need to bake in two goes ( 2 cake layers at a time) only mix up enough ingredients to bake two cakes. Don’t have cake mix sitting around waiting for the first cake tins be become free. The cake mix will lose air and the cakes won’t rise as much as they should.
- Heat your oven to 180ºC (160ºC Fan)
- Mix the butter and margarine together well then add the sugar and beat until pale and fluffy. This will take 2-3 minutes.
- Add the egg a little at a time until it’s combined. If it starts to curdle add a spoonful of the flour.
- Add the vanilla essence.
- Add the flour (with the baking powder) in three batches alternating with the hot water. I’ve just discovered this neat little trick. It makes the cakes more moist and they will have fewer holes in the sponge compared to adding all the flour then all the water. Add sprinkles and mix.
- Pour cake mix into each cake tin. In order to keep the cakes the same depth once baked aim for 350g of cake mix in each tin.
- Bake for 30 minutes or until the cake comes away from the sides and a light press in the centre of the cake springs back instantly.
- Leave to cool completely on a wire rack.
- If storing overnight, once cool wrap your cakes in clingfilm but don’t stack them directly on top of each other as they may stick together.
For the buttercream decorations
- ½ Jar of seedless raspberry jam
- 500g butter- at room temperature (President butter tastes best)
- 1kg icing sugar
- 2 tsp vanilla essence
- pink food colour
- sprinkles to scatter – (I used around 100-150g)
- Place the butter in a mixing bowl then sieve the icing sugar over the top. I place a tea towel carefully over the mixer (make sure it is safe guys!) so that the puffs of icing sugar don’t coat my whole kitchen. Once it’s combined add the vanilla essence and mix again. If it’s too thick you can add a little milk to soften it.
- Add a little pink food colouring at a time till you get the desired colour
Decorating the Sprinkle cake
Heat up the raspberry jam in a microwaveable dish for a few seconds at a time until it is nice and runny. Use a silicon pastry brush to cover the whole of the first layer of cake. Leave the cake to cool a bit – otherwise it will melt the buttercream and your next layer will slide off.
Take the second cake layer and smoother it with buttercream then position it buttercream side down over the jam. Repeat until you have done all layers.
Give the whole cake a crumb coat. This is the first coating of buttercream which seals in any crumbs in and hides any lines in the cake lauers. It doesn’t have to be perfect but the neater it is now the better your top coat will be. I didn’t cover the top as I was going to roll the cake in sprinkles if I didn’t like the initial effect and I would have needed to handle the top if that was the case.
Pop the cake in the fridge to firm up for at least 20 minutes.
Give the cake a second ‘top coat’ of buttercream. This is the one that you want to be as straight and smooth as possible. I use a spatula to add the buttercream then use a side scraper to make sure it’s straight.
A smoother is the perfect tool to drag around the cake to get a smooth finish.
I put the cake on a cakestand (because I am crazy- if you haven’t read why you can do so here!) And prepared to add the sprinkles. You need to add them while the cake is still freshly buttercreamed so they stick well. The way this cake looks is how I imagined it turn out, but if it all went wrong then I planned to roll the whole cake in sprinkles to coat the whole thing. For that I would have needed to hold the top and bottom of the cake- hence I didn’t buttercream the top till the very end.
To add the sprinkles I placed the cakestand over a tray and poured the sprinkles onto the bottom edge. I then threw small handfuls at the sides so there were just a few all over the cake. When I was happy with the look – and I had forced Darcey to stop throwing sprinkles all over the place and at my cake) I coated the top.
To make a clear number 2 I placed the largest cookie cutter I had in the centre then carefully poured some sprinkles inside. I used a decorators paintbrush to press them down so they stuck in place when the cutter was lifted off.
The last thing to do was to remove any loose sprinkles from the cakestand and try to deliver it. Try being the word!
EmmaMT
Posts you may enjoy
Mini Banoffee pies by Mary Berry
How to make a sprinkle cakeThe RG’s Engagement cake
Amelia’s Brightly coloured birthday cake
The RG’s breakfast pancake recipe. Sugar free and delicious
Mini Strawberry Pavlova recipe….well it is the Wimbeldon season!
15 Lessons I learnt at Leiths Cookery School.
How to make coloured sugar decorations
Extra Chocolatey Christmas Pudding Cookies


Looks gorgeous. Cx